How to Blow Out Your Sprinkler System for Winter (Without Breaking a Valve)
By Turfrain
To properly blow out your sprinkler system for winter, shut off the water, attach a regulated air compressor to the blowout port after the backflow, and clear each zone with 40–60 PSI until only a fine mist appears. Cycle zones 2–3 times, drain and set backflow handles at 45°, insulate exposed parts, then turn the controller Off.
What you’ll learn in this blog
The exact steps to winterize a lawn sprinkler system safely
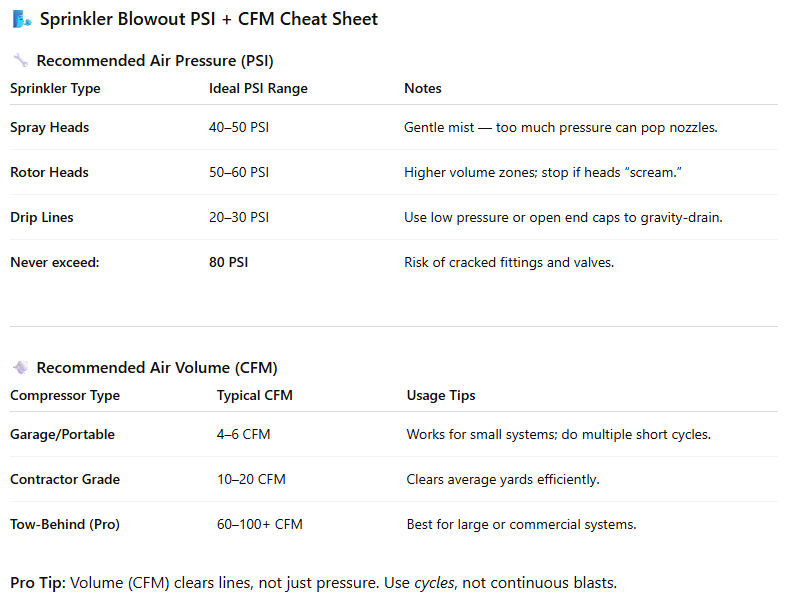
What PSI/CFM you need (and what to avoid)
How long to run each zone and how many cycles to do
Common mistakes that crack pipes and damage backflows
When DIY makes sense vs. when to call a pro
The big three you can’t skip (seriously)
Protect the backflow preventer. Never push air through it from the wrong side. Connect after the backflow at the designated blowout port. That brass “U-shaped” device by your foundation? Baby it. It’s expensive.
Regulate the pressure. For most residential systems, 40–60 PSI is the sweet spot. Mist, not fog or geysers, is your goal. Never exceed 80 PSI.
Use cycles, not marathons. One long run per zone overheats components and still leaves water in low spots. Short, repeated runs clear more water safely.
Okay, let’s actually do the blowout (step-by-step checklist)
Turn off the water supply to the irrigation system at the main shutoff or isolation valve.
Power down pumps (if you have a pump) and set the irrigation controller to Manual/Off so zones can still be activated.
Locate your blowout port after the backflow preventer (often a capped quick-coupler or threaded port).
Attach a compressor with a regulator and a ball valve. Wear eye protection. Open a nearby sprinkler head or test cock to relieve pressure.
Set pressure to 40–60 PSI. Start with the zone farthest from the compressor to push water “downstream.”
Run the first zone 1–2 minutes until water turns to light mist. Stop before heads scream or spin excessively.
Move to the next zone. Repeat for all zones.
Cycle through all zones 2–3 times. Each pass gets a little more water out of low points.
For drip zones: reduce pressure to 20–30 PSI or simply open end caps and gravity-drain to avoid damaging emitters.
When done, drain the backflow. Turn its test cocks 45° and leave the shutoff handles halfway open (45°) so trapped water can expand.
Insulate exposed piping/backflow with covers or foam. Set the controller to Off/Rain mode, and note your spring start-up date.
Numbers that matter (PSI, CFM, compressor size, and timing)
Pressure (PSI): 40–60 PSI for most residential zones. Rotors may tolerate up to ~60 PSI; sprays prefer the lower end. Never over 80 PSI.
Air volume (CFM): Volume clears lines, not pressure alone. A tow-behind (60–100 CFM) is ideal. A 4–6 CFM garage compressor can work—just take more cycles and give it breaks.
How long per zone: 1–2 minutes per pass until mist, not a steady stream. Three passes beats one long blast.
Drip lines: Keep pressure gentle (20–30 PSI) or open ends to drain. Those tiny emitters aren’t fans of high air speed.
Backflow preventer: Always connect after it. Draining and leaving handles at 45° prevents trapped water from cracking the body.
Avoid these wallet-draining mistakes
Blowing through the backflow: It’s the fastest way to a springtime “why is my basement wet?” moment.
Too much pressure, too little volume: Cranking PSI tries to “force” water out, but it only risks head damage. Volume + cycles is safer and more effective.
One-and-done pass: Water hides in low spots. Multiple light cycles move it along without roasting solenoids.
Forgetting the hidden zones: Valve boxes, drip circuits, side yards, landscape beds—easy to miss, expensive to repair.
Leaving water in the backflow: Drain it, test cocks at 45°, insulate. Think of it like tucking in the most fragile part of your system.
Quick answers to questions homeowners ask
Is 50 PSI enough to blow out sprinklers? Yes, for most residential systems, especially when you run 2–3 cycles.
Can I use my small garage compressor? Yes, if you’re patient. Work in short bursts, let it recover, and expect more cycles.
Do I still need a blowout if my system has automatic drains? In freezing climates, yes. Drains help, but they rarely clear everything.
How do I know it’s clear? You’ll see water turn to mist, then mostly air. Don’t chase “perfectly dry”—chase “no standing water.”
DIY or call a pro? A quick sanity check
DIY makes sense if:
You can identify your backflow and blowout port.
You have a regulator and know how to set PSI.
You’re comfortable running each zone in cycles.
Call a pro if:
You’re on a well or booster pump and aren’t sure how to isolate it.
You have complex drip/rotor mixes, multiple manifolds, or commercial-size lines.
You’d rather save Saturday morning and get a warranty on the work.
Conclusion and friendly nudge
Winterizing doesn’t have to be stressful. With the right pressure, a few short cycles, and a little patience, you’ll protect your lines, heads, and backflow from freeze damage. If you’d rather have a trusted hand on the hose, Turfrain can handle your blowout quickly and safely—no guesswork, no cracked valves. Contact Us and we’ll get you winter-ready, fast.
.png)