How to restart your irrigation system in spring (without burst pipes or soggy surprises)
By Turfrain
To restart your irrigation system in spring after winter, open the main valve slowly, pressurize one zone at a time, inspect for leaks, clean filters and heads, recalibrate the controller for spring run times, and test each zone. Starting gently prevents burst pipes, unexpected water bills, and patchy grass. Plan for midday testing and give valves a minute to breathe.
What you’ll learn from this blog
A step-by-step irrigation startup checklist after winter
How to turn water on slowly to protect pipes and valves
What to check on your controller for spring schedules
How to spot hidden leaks, clogs, or broken sprinkler heads
When to water first and how to adjust for early spring weather
Start here: your quick spring irrigation startup checklist
Think of this as your pre-flight list before the first watering run. It’s short, it’s sweet, and it saves money.
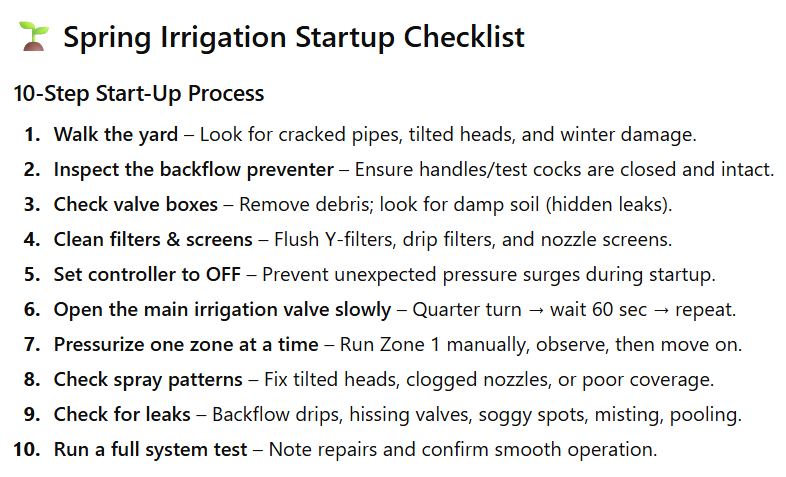
Walk the yard: Look for cracked pipes, leaning heads, damage from snow shovels, or animal mischief.
Check the backflow preventer: Ensure handles are closed, test cocks are snug, and nothing froze or split.
Inspect valve boxes: Clear debris; look for damp soil that hints at a slow leak.
Clean filters: Unscrew and rinse Y-filters and drip filters; clogged screens starve zones of pressure.
Power up the controller: Put in fresh batteries (if applicable), set the correct date/time, and disable any rain delays.
True story: a neighbor spun his main valve wide open and pop—an old fitting let go like a champagne cork. Opening slowly is the difference between a calm startup and a soggy afternoon.
Gentle pressure, no drama: turning on water the right way
Water hammer—those sudden pressure surges—can crack fittings and bruise valves. Avoid it by easing into spring.
Open isolation valves a quarter turn at a time, pausing 30–60 seconds between turns. Let the system breathe.
Pressurize one zone at a time: manually run Zone 1, watch it stabilize, then move to Zone 2, and so on.
Listen for spit and sputter: Air in lines is normal at first. Once it clears, check spray patterns.
Use a pressure gauge if you have one: 40–60 PSI is typical for many residential systems. Too high? Consider a pressure regulator or ask a pro.
If you see misting (water turning foggy), pressure might be too high. If heads barely pop up, something’s restricting flow—often a dirty filter or partially closed valve.
The step-by-step irrigation startup after winter
Follow this sequence once, slowly, and you’ll be golden.
Confirm the ground is thawed. If the soil is still frozen, wait—ice in lines can spell trouble.
Close all drain valves and test cocks on the backflow preventer.
Set your controller to Off (or Rain Delay) while you pressurize.
Open the main water valve to the irrigation line one quarter turn. Wait 60 seconds. Repeat until fully open.
Turn your controller to Manual and run Zone 1 for 2–3 minutes.
Walk the zone. Straighten tilted heads, clear grass around spray nozzles, and clean filters/screens as needed.
Repeat for each zone, making small fixes as you go.
Check the backflow preventer for drips, hissing, or sweating—signs of internal leaks.
Set your seasonal watering schedule (see next section).
Run a full system test and note any repairs you need to schedule (like a stuck valve or broken pipe).
Controller reboot: schedule smarter, not longer
After winter, your lawn doesn’t need summer-level watering. Overwatering in spring is the fast lane to fungus and shallow roots—no thanks.
Start conservative: For cool-season lawns, aim 2–3 days per week, 10–15 minutes per spray zone, 20–30 for rotors. Drip lines may run longer but less frequently.
Try cycle-and-soak: Instead of one 15-minute run, do three 5-minute cycles with 20–30 minutes between. Water soaks in rather than running off.
Use Seasonal Adjust: Set base programs for summer, then dial the Seasonal Adjust down to 60–80% in spring to avoid reprogramming everything.
Sync with weather: If your controller has a rain sensor or local weather feed, enable it. Spring storms can cover your needs for days.
Name zones: “Front lawn - rotors” is more helpful than “Zone 3.” You’ll thank yourself later.
Hunt the sneaky leaks: how to spot what you can’t see
Leaks don’t always announce themselves. Sometimes they whisper—like a slowly damp valve box or a pressure dip.
Meter test: With household water off, run a zone and watch your water meter. If the flow doesn’t stop when the zone stops, something’s leaking.
Valve box sniff test: If it smells musty or looks muddy in dry weather, there’s likely a seep.
Overspray and pooling: Water pooling near sidewalks or unusually green patches often point to a broken lateral line or a stuck-on valve.
Head check: If one head gushes while others barely spray, the nozzle might be missing or the riser cracked.
Drip audit: Open end caps on drip lines to flush debris for 30 seconds, then reseal.
Quick fix checklist
Replace clogged or worn nozzles.
Straighten and raise sunken heads with a short riser extension.
Tighten unions and couplers; replace cracked fittings.
If the backflow preventer or main valve leaks, stop and consult a licensed pro—those are safety devices tied to local codes.
First watering and the weeks after: dial it in, then relax
The first proper soaking helps reawaken roots. After that, you’re tuning.
Do a tuna can test: Place a few shallow cans in the zone and run a normal cycle. Measure how much water you’re actually putting down. Aim for about 0.5–1 inch per week in spring, counting rainfall.
Water early morning: Less wind, less evaporation, happier turf.
Adjust for shade: Shady zones often need less. South-facing slopes often need more or shorter, more frequent cycles to avoid runoff.
Keep an eye on edges: Brown edges often mean head-to-head coverage or arc settings need tweaking.
Safety notes you’ll be glad you read
Backflow preventers protect drinking water. If you suspect damage, don’t DIY the repair—code matters, and fines are no fun.
If you used compressed air for winterization, ensure all blowout caps and drains are closed before startup.
Not sure about your system layout? Take photos of valve boxes and backflow markings now; they’re a lifesaver later.
In short, patience pays. A careful, zone-by-zone restart will keep your lawn lush and your plumbing drama-free.
Conclusion
Restarting an irrigation system in spring isn’t complicated; it’s careful. Open valves slowly, test each zone, fix the little things, and set a smart, spring-lean schedule. If you want a worry-free startup or spot a problem you’d rather not wrestle with, Turfrain is here to help. Got questions or need a tune-up? Contact Us and we’ll make your lawn season-ready.