How to winterize your sprinkler system: a simple homeowner’s guide
By Turfrain
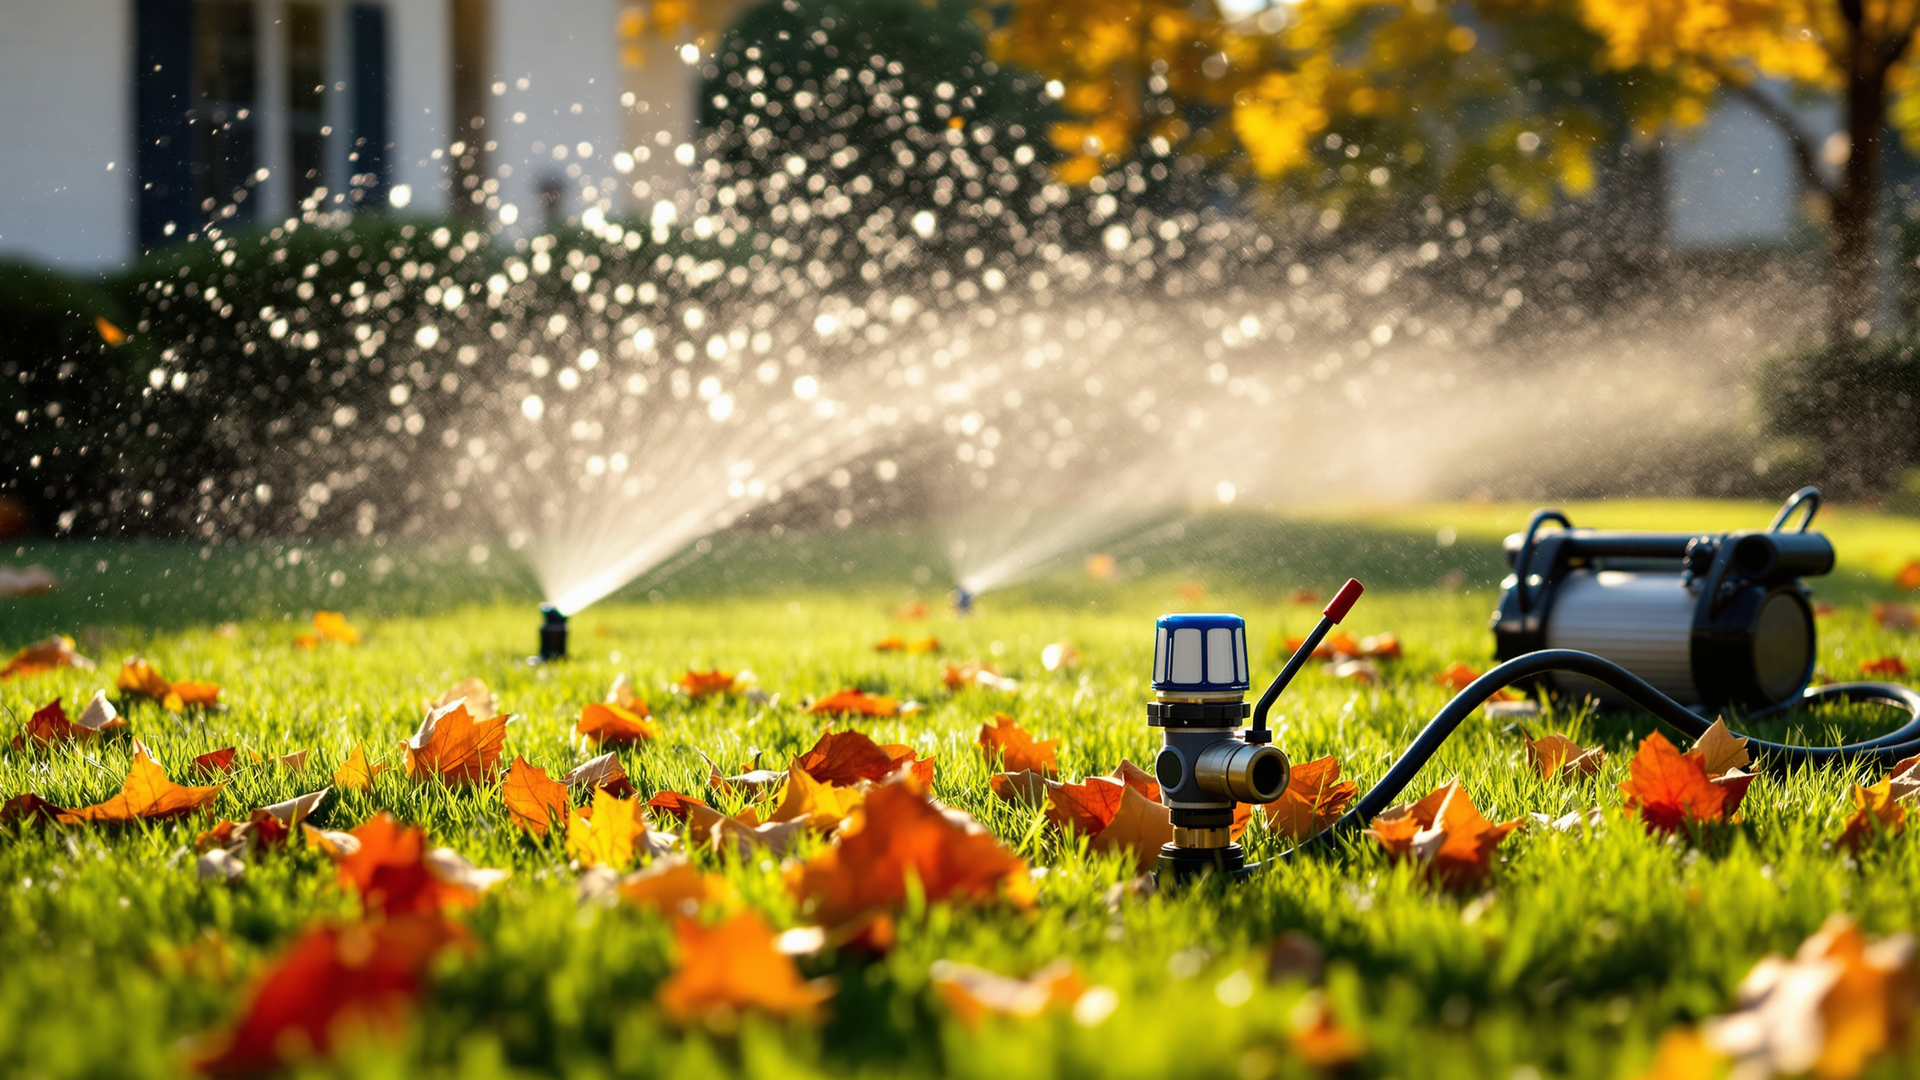
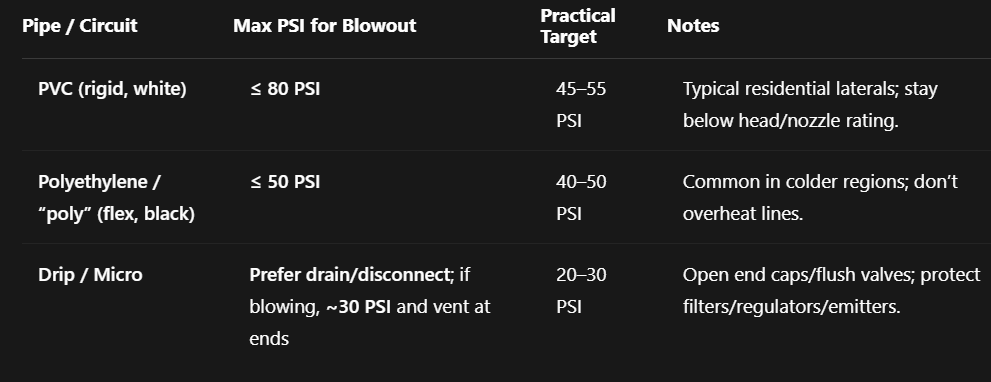
Shut off the irrigation water, protect the backflow, then clear each zone with regulated compressed air until only mist blows out. Work from the farthest zone, keep pressure modest (around 50 PSI for PVC, up to 60–80 PSI for poly), and open all drains. Finish by insulating exposed parts and turning the controller off.
What you’ll learn in this blog
The best time to winterize your sprinkler system
Tools you actually need (and what you don’t)
Safe air-compressor settings and a step-by-step blowout
How to protect your backflow preventer
Options if you don’t own a compressor
Common mistakes that crack pipes—and how to avoid them
Start here: timing and tools that keep pipes from popping Think of winterization like putting your lawn to bed before the first hard freeze. As soon as night temps hover at or below 28°F for several hours—usually late October to early November in many regions—plan your blowout. Waiting after the first freeze is a bit like forgetting your coat and then running back for it.
What you’ll need:
Adjustable wrench, flathead screwdriver
Safety glasses and gloves
Air compressor with regulator (a small 4–6 gallon unit can work; more CFM = faster)
Blowout adapter (quick-connect or Schrader fitting)
Teflon tape and an old towel
Insulation cover for the backflow preventer
Pro-tip: You don’t need a tow-behind compressor for most homes, though pros love them for speed. A portable compressor with patience gets it done.
The safe blowout method, step-by-step (no heroics needed)
Quick story: my first cold snap taught me the “$200 lesson”—a cracked backflow that could’ve been saved by ten careful minutes. Here’s how to avoid that.
Step 1: Turn off the irrigation water
Shut the irrigation shutoff valve inside your home or in the valve box before the backflow device.
On the controller, switch to Off or Rain mode.
Step 2. Protect the backflow preventer (RPZ/PVB)
Turn the two ball valves on the backflow to a 45° half-open position.
Open the test cocks with a flathead to let trapped water dribble out. Let it weep—water should escape.
Step 3. Connect the compressor
Attach the blowout adapter to the designated port on the irrigation side (after the backflow whenever possible).
Set regulated pressure: aim for 50 PSI for PVC systems; up to 60–80 PSI for polyethylene pipe. The goal is enough air to move water, not enough to launch a sprinkler head into orbit.
Step 4. Clear zones one by one
Start with the farthest zone and work your way closer.
Run the zone until water turns to mist, usually 1–3 minutes. Stop before heads chatter or squeal for too long—dry running heats things up.
Give the compressor and zones a breather between cycles if needed, then repeat once more per zone if you still see heavy spray.
Step 5. Don’t forget drip lines and side taps
Open caps on drip manifolds to let them burp out moisture.
If you have hose bibs tied to irrigation, drain them too.
Step 6. Finish line
Open any manual drain valves in low spots.
Leave the backflow test cocks slightly open for winter and keep those ball valves at 45°.
Insulate the backflow assembly with a breathable cover (not a plastic bag).
Confirm the controller is Off. If it has a backup battery, it may still try to run—double-check.
Backflow preventer TLC: small device, big money saver
Your backflow is like the bouncer at the club—keeps contaminated water out of your home’s drinking water. A cracked backflow can easily cost a few hundred bucks to replace, so:
Always drain it: open test cocks, set ball valves at 45°, never trap water inside the body.
Avoid blasting air directly through a closed device. Whenever possible, introduce air after the backflow to protect internal parts.
Insulate it: a fitted cover helps, but in harsh climates add a little fiberglass wrap inside the cover for extra warmth.
No compressor? Here’s your Plan B (and C) No compressor at home? You’ve got options:
Manual/auto drains: Some systems have automatic drain valves that open at low pressure and manual drains at low points. Open them all after shutting water off. It helps—but it’s not always as thorough as a blowout.
Rent a compressor: A small rental unit for an hour or two does the trick. Ask for a regulator and the right adapter.
Call a pro: For complex systems or RPZ devices, a professional blowout is quick and surprisingly affordable.
Common mistakes that crack lines—and how to dodge them
Too much PSI: High pressure can damage heads and fittings. Stay near 50 PSI (PVC) and max 60–80 (poly). Think volume over pressure.
Endless run time: Don’t bake your system. Short bursts until mist, then stop.
Ignoring low spots: Manual drains in low areas are your friend.
Forgetting drip zones: They hide water. Crack them open to vent.
Backflow oversights: Leaving valves tightly closed traps water. Keep them slightly open so ice can expand without breaking parts.
Fast answers to the questions homeowners actually ask
When should I winterize? Before your first deep freeze—usually late fall. If you’re asking “Is it too late?” do it now.
Do I need a compressor to winterize? It’s best. Manual drains help, but blowouts clear more water.
What PSI to blow out sprinklers? Around 50 PSI for PVC; up to 60–80 PSI for poly. Use a regulator.
How long per zone? 1–3 minutes until mist, with breaks.
How much does a pro cost? Typically 60–150 for most homes; larger properties or complex systems may be higher.
Wrap-up and a friendly nudge Winterizing your sprinkler system is mostly about timing, gentle air pressure, and a little patience. Depending upon the tools you have, it can take long to fix this. Do it once, do it right, and you’ll skate past spring without surprise repairs. If you’d rather skip the guesswork, Turfrain can handle your blowout quickly and safely. Contact Us and we’ll get you scheduled before the next cold snap.