When to Winterize Your Sprinkler System (and the Exact Temperatures to Watch)
By Turfrain
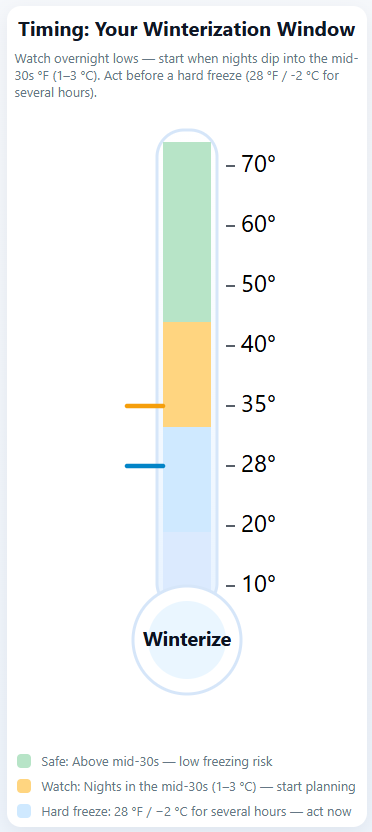
Winterize your sprinkler system 1–2 weeks before your area’s average first freeze. Start when overnight lows live in the mid-30s °F (1–3 °C) and a hard freeze—28 °F (-2 °C) for several hours—is in the forecast. That’s your go-time. Earlier is better than later; water expands when it freezes, and pipes don’t forgive.
What you’ll learn from this blog
The best temperatures and timing to winterize a sprinkler system
A quick awareness checklist you can run in five minutes
A simple, step-by-step blowout process (DIY or pro-ready)
Common mistakes that crack pipes and wreck backflow preventers
DIY vs. hiring a pro: cost, tools, and time
Special notes for drip lines, shallow pipes, and valve/backflow care
Your no-guesswork timing: watch the temps, not the calendar
If you remember one thing, remember this: the right time to winterize is when overnights sit in the mid-30s °F and a hard freeze (28 °F for a few hours) is likely. That’s when water trapped in pipes can turn to ice and expand. Curious about months? Rough guide:
Colder climates (Upper Midwest, Rockies, New England): late September to October
Temperate zones (Mid-Atlantic, Pacific Northwest): October to early November
Milder winters (Southeast, Southwest): winterize only if you regularly see freezes; otherwise shut down and drain before any forecasted freeze
Pro tip: set a “Freeze Watch” alert in your weather app. The first time it pings, it’s your cue to act. I’ve seen neighbors wait for the first snow—guess who’s replacing cracked manifolds in spring?
The quick awareness checklist (5 minutes, zero tools)
Nighttime lows hitting 35–38 °F for several nights? Check.
Forecast shows 28–30 °F for a few overnight hours? Check.
Shady spots or shallow-buried lines in your yard? Higher risk—check.
Exposed backflow preventer or copper pipes above ground? Must protect—check.
You can’t remember the last time this system was winterized? Don’t wait—check.
Step-by-step: how to winterize your sprinkler system (DIY blowout or prep for a pro) Summary: Shut off water, drain what you can, blow out zones with safe air pressure, then leave everything in a freeze-friendly position.
Step 1: Power down water and prep
Turn off the irrigation water supply at the main shutoff.
If you have a backflow preventer outdoors, switch the two ball valves to a 45-degree “half-open” position to relieve stress.
Open the two small test cocks on the backflow to drain any trapped water.
Kill controller power or set it to Winter/Off. Replace the^{9V} backup battery now so spring starts smooth.
Step 2: Drain what gravity will give you
If your system has manual drain valves on low points, open them and let water out.
Got drip lines? Uncap the end flush caps to drain; recap after.
Step 3: Blowout (the safe way)
Use an air compressor with adequate airflow (10–20 CFM at ~50 PSI is ideal) and an irrigation blowout adapter.
Connect to the blowout port downstream of the backflow preventer. Don’t push air backward through the backflow—those parts are pricey.
Run each zone one at a time:
PVC lines: keep air pressure under 80 PSI.
Polyethylene/drip: keep air pressure around 30–50 PSI.
Cycle each zone until mist turns to a light vapor and stops (about 1–2 minutes). Then cycle each zone one more short pass. Avoid continuous long blasts that overheat solenoids.
Never leave the compressor unattended, and wear eye/ear protection. It’s loud and occasionally messy.
Step 4: Button up for winter
Leave ball valves on the backflow at 45 degrees, test cocks open at 45 degrees, and caps loosened so trapped moisture can escape.
Insulate exposed copper, PEX, or the backflow body with an outdoor-rated cover.
Label zones or snap a quick photo of the controller settings for spring.
Avoid these common “crack-makers”
Waiting for the first “real” snow. Ice forms before that; pipes don’t care about your calendar.
Over-pressurizing during blowout. More PSI does not mean better. It means broken fittings and scorched valves.
Forgetting the backflow preventer. Those check valves are delicate and expensive to replace.
Ignoring drip zones. Water hides in emitters and lines—drain or gently blow them out at lower PSI.
Leaving the controller on auto. A surprise warm spell can trigger a cycle and refill lines you just cleared.
Skipping insulation for exposed pipes. A 20covercansavea300 repair.
DIY or call a pro?
A quick reality check DIY makes sense if you:
Have a proper compressor (not just a small tire inflator), the right adapter, and 30–60 minutes
Understand your backflow preventer and can safely bypass it for the blowout
Are comfortable working zone-by-zone without rushing
Aren’t sure where the blowout port is or how to protect the backflow
Have a complex system (multiple manifolds, drip/rotor mix, long runs, shallow lines)
Want a guaranteed, documented winterization to protect your spring startup
Typical pro blowout runs around 75–150 for most homes and takes 20–40 minutes. One visit now is cheaper than a cracked manifold or split copper later.
Little extras that pay off in spring
Replace the controller battery, clean the weather sensor, and jot down each zone’s purpose (front rotors, veggie drip, side strip).
Walk the yard and flag any shallow spots or areas that puddle. You’ll know where to check first when you start up.
Store spare nozzles, a roll of Teflon tape, and a couple of couplers in a small “spring kit.” You’ll thank yourself.
Conclusion and a friendly nudge
You don’t need a crystal ball—just watch for mid-30s nights and any hard-freeze forecast. But should you start winterizing before that first frost? Find out in our next guide: Should I Winterize Before the First Frost? Do This 2–4 Weeks Ahead for a Stress-Free Lawn. Shut off water, drain, blow out gently, and tuck everything in for winter. If you’d rather not wrestle with compressors and valves, Turfrainwill handle the whole checklist quickly and safely. Contact Us and we’ll get you winter-ready before the first freeze sneaks in.